Thursday, April 26, 2018

Illustrated Steps To Creating Scheduled Shutdown and Startup for Azure Virtual Machines (Azure VM)

Creating my Nigerian Market Data app (stocks, economic and fx rates app) involved setting up an Azure VM that I run a couple of Python scripts on daily. 


I used Windows Task Scheduler to automate the Python scripts to run between 9:20 pm and 11:00 pm. It wouldn't make sense to keep the server (Azure VM) running all day. So I set up an automation on Azure to start up the server at 9:00 pm and shut it down by midnight. Below are the steps to doing this.

If you run a search online, you will come across multiple ways to doing this. Some require you writing Powershell scripts. The method I am going to illustrate is the least error prone and most straightforward way I have come across.

Step 1: Log into your Azure account portal


Click on Create a resource.

Step 2: Search for Automation


Click on Automation.

Step 3: Create a new Automation


Step 4: Complete the Automation Account Creation
Make sure to tick use existing resource group, and pick the resource group of the VM you want to auto shutdown/startup. Also best to match the location selection.


Step 5: Add Startup and Shutdown Runbooks to the Automation Account
Select the automation account you just created.


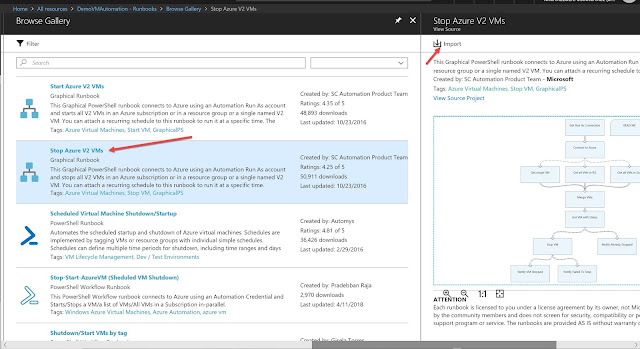
Select Runbook under Process Automation. And click on Browse gallery. This allows you to create the startup and shutdown automation runbooks.


Click on Edit in the created Runbook


Then publish the runbook.


Click on Schedule after publishing.


Set the Time to run the Start VM runbook by clicking on "Link a Schedule to your runbook"


Lastly, set the parameters which will link it to the VM you want to control. Make sure you match the resource group and VM name. You can leave the AzureConnectionAssetName blank so the default is used.


Now you repeat same steps for Shutdown runbook after picking from the runbook gallery.


Step 6: Sit back and watch the automation runbooks do their work

You can monitor the runbook activities from Jobs in the Runbook Overview.


And that's all!

Sunday, April 22, 2018

Easy Steps To Creating And Deploying A Predictive Model Using Azure Machine Learning Studio

Yesterday, I demoed how in 10 mins you can create a predictive model, deploy it as a web service and test it without having to install anything or pay any money. That is the awesomeness made possible by Microsoft with the super easy to use Azure Machine Learning Studio. The yesterday event was the Lagos edition of the Global Azure Bootcamp held at Microsoft office, Lagos.

Participants were able to follow along, created and deployed their own predictive models too. In today's post I will be guiding you with easy steps to follow on how you too can in a few minutes create and deploy a predictive model cost-free with Azure Machine Learning Studio.

Step 1
Download the sample data we would use: Bank Marketing data from UCI Machine Learning Repository. If you download from UCI Machine Learning Repository directly, then it is the bank-additional-full.csv file in the zip file you end up with. Then you have to make sure that you break the data into separate columns rather than leave them comma separated, using Excel's Text to Columns. For you ease, I have shared a cleaned version you can directly use without any extra work by you: Bank Marketing data download

The sample data is a marketing campaign data of a Portuguese bank from May 2008 to November 2010 recording the details of prospects reached via phone calls and whether they eventually took up the service the bank was trying to sell them.
The cleaned sample data
Below is the explanation of the different fields in the data records.

Input variables:
# bank client data:
1 - age (numeric)
2 - job : type of job (categorical: 'admin.','blue-collar','entrepreneur','housemaid','management','retired','self-employed','services','student','technician','unemployed','unknown')
3 - marital : marital status (categorical: 'divorced','married','single','unknown'; note: 'divorced' means divorced or widowed)
4 - education (categorical: 'basic.4y','basic.6y','basic.9y','high.school','illiterate','professional.course','university.degree','unknown')
5 - default: has credit in default? (categorical: 'no','yes','unknown')
6 - housing: has housing loan? (categorical: 'no','yes','unknown')
7 - loan: has personal loan? (categorical: 'no','yes','unknown')
# related with the last contact of the current campaign:
8 - contact: contact communication type (categorical: 'cellular','telephone') 
9 - month: last contact month of year (categorical: 'jan', 'feb', 'mar', ..., 'nov', 'dec')
10 - day_of_week: last contact day of the week (categorical: 'mon','tue','wed','thu','fri')
11 - duration: last contact duration, in seconds (numeric). Important note: this attribute highly affects the output target (e.g., if duration=0 then y='no'). Yet, the duration is not known before a call is performed. Also, after the end of the call y is obviously known. Thus, this input should only be included for benchmark purposes and should be discarded if the intention is to have a realistic predictive model.
# other attributes:
12 - campaign: number of contacts performed during this campaign and for this client (numeric, includes last contact)
13 - pdays: number of days that passed by after the client was last contacted from a previous campaign (numeric; 999 means client was not previously contacted)
14 - previous: number of contacts performed before this campaign and for this client (numeric)
15 - poutcome: outcome of the previous marketing campaign (categorical: 'failure','nonexistent','success')
# social and economic context attributes
16 - emp.var.rate: employment variation rate - quarterly indicator (numeric)
17 - cons.price.idx: consumer price index - monthly indicator (numeric) 
18 - cons.conf.idx: consumer confidence index - monthly indicator (numeric) 
19 - euribor3m: euribor 3 month rate - daily indicator (numeric)
20 - nr.employed: number of employees - quarterly indicator (numeric)

Output variable (desired target):
21 - y - has the client subscribed a term deposit? (binary: 'yes','no')

Step 2
Sign up for Azure ML studio. It is easy and free: https://studio.azureml.net 


Step 3
Upload the Bank Marketing dataset. From Datasets section on the left menu pane, click New at the bottom left.


Step 4
Create a new experiment. From Experiments section on the left menu pane, click New at the bottom left. Choose a blank experiment, as we are creating ours from scratch.


Step 5
Now we start dragging the tasks we want to carry out into the Experiment workspace, after renaming the Experiment.


Drag in the dataset we uploaded, it is in the Saved Dataset section on the left.


Next, we need to isolate the fields that would be useful for our predictive model. If you look at the description of all the fields in the dataset, it is obvious that some are not practically useful in creating a prediction of whether a prospect will take up the marketed service or not. Example is the length of the call, there is no way you would know that until the end of the call -- so not useful for profiling who to call (targeted marketing). By my thinking, the fields I that would be of real world use in creating an actionable predictive model are -- age, job, marital, education, default, housing, loan.

Drag Select Columns in Dataset in the Manipulation subsection of Data Transformation section. Connect the dataset previously dragged in to the select columns task. Then click on Launch column selector, and select the columns needed (including the outcome we want to predict, so as to be able to train the model).


Next, split the data into training set and testing set for building our predictive model. Drag Split Data, connect to the select columns task and on the settings pane on the right, set the training set to 0.75 (75%) of the entire dataset.


Drag in the model algorithm to use. It's under the Initialize Model. I chose to use the Two-Class Decision Forest. In the end, you would evaluate the model to see if it fits well or you should try another algorithm.


Drag in Train Model. Connect to both the already dragged in algorithm and the left side of the Split Data (training set). Select the outcome to predict.


Drag in Score Model. Connect to the Train Model and the testing set of the Split Data.


Lastly, drag in Evaluate Model. Connect to Score Model.


Now run the entire experiment.


Wait for it to finish running.


Right click on Evaluate Model and visualize the evaluation result to see the fitness/accuracy of the algorithm.


If you are okay with the fit, then what's left is to publish. Otherwise, you can change the algorithm, re-run and re-evaluate the fit.


Step 6
Now you set up the model as a web service that can be deployed online.


Change the input connector to point to the Score Model. 


Also, remove the predicted column from the Selected Column as it was only needed for training the model.


Now re-run and deploy as web service.


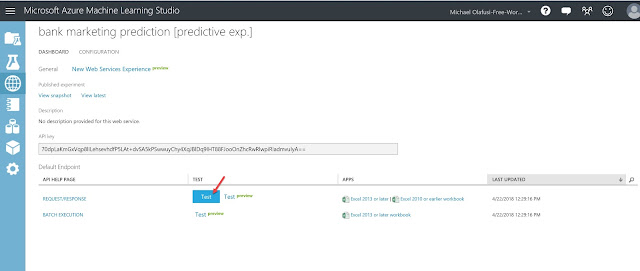
You are presented with the web service details to use for integrating with any app or online tool. You can even test the API directly.


And that's how you create and deploy a predictive model in Azure Machine Learning Studio without installing anything on your computer and without paying a cent/kobo.

Enjoy!